Okay I have to be honest, I am not a great gift wrapper. I mean I know how to make it pretty but I tend to be a last minute shopper around the holidays and the pure volume of gifts prevents me from giving each gift the TLC it deserves. After years of watching my friend Meghan (yes, same one from the WREATH CHALLENGE), wrap gorgeous gifts for everyone around me I decided to reach out for help. Meghan does not take wrapping gifts lightly (people actually hire her to wrap their gifts) and I was determined for her to spill her secrets. So here ya go…the ins and outs of the perfect gift wrap.
TAKE THE TIME TO MEASURE: cutting your paper to the right size will allow for cleaner folds and will decrease the chances of paper getting bunched up (yuck!).
DON’T BE AFRAID OF TAPE: You will want to tape at each step to hold your package and all of your work in place. This prevents the package from slipping around inside while you wrap.
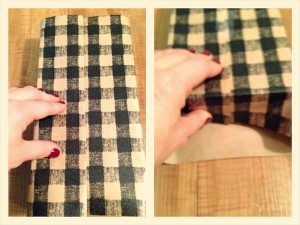
CREASE CREASE CREASE: A clean fold and crease makes all the difference. Make sure you fold and crease the long side before securing it. It’s like adding a hem to your package and makes it look like a professional did it!
FOLD DOWN FIRST: For the sides of the package, I like to fold down first securing the open seam end with tape and creasing the sides to make triangles. If you have cut carefully in the beginning this will be nice and neat without any bunches of paper. Then the triangle sides will neatly fold in.
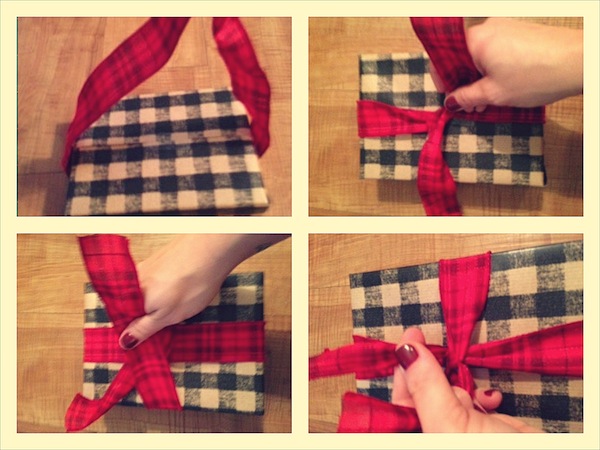
RIBBON: I strongly believe that you can’t beat real ribbon for making a package look special. Pre measure the ribbon and cut it to go around the gift twice. Flip the box over (seam up) and put the ribbon underneath. Pull both sides up so that they are the same length. Then cross the sides over so that they overlap. Then twist so that you make a cross with the ribbon or a ‘t”. Once you get both sides tight, flip the package over and pull the two sides up to make another “t”. You will tie these to make a tight knot.
MAKE IT PERSONAL: At this point you will want to add a little something extra like an ornament, bell or small toy and attach with your tag. I used mustache tags for all the men in my life! You can use the tails of your ribbon to affix a bow. There are tons of bow making tutorials for just about any bow that tickles your fancy. If you are going for a traditional bow then I find that 6-10 loops will give you enough density and if you are using wire ribbon it will stay perfectly voluminous!
I hope this helps make the gifts under your tree feel a little fancy and if feel like out sourcing this task, you can actually hire Meghan to wrap your gifts for you!
Brenda
June 6, 2014 at 9:32 am (11 years ago)Very good blog post. I certainly love this website.
Thanks!
10 panel drug test
May 25, 2014 at 6:39 pm (11 years ago)Appreciating the hard work you put into your site and in depth information you present.
It’s good to come across a blog every once in a while that isn’t
the same old rehashed material. Fantastic read!
I’ve bookmarked your site and I’m including your RSS feeds to
my Google account.
www.southhaventribune.net
May 15, 2014 at 4:02 pm (11 years ago)What’s Happening i’m new to this, I stumbled upon this I
have found It absolutely useful and it has aided me out loads.
I am hoping to give a contribution & assist other customers like its helped me.
Great job.
Lowry
December 20, 2013 at 2:21 am (12 years ago)Meghan is amazing! Where did she learn to make bows like that?!
Thanks for the info!
Kathy Enfinger
December 18, 2013 at 7:04 pm (12 years ago)Meghan’s magic! Thanks for the step by step!
“Make it personal” is so important!